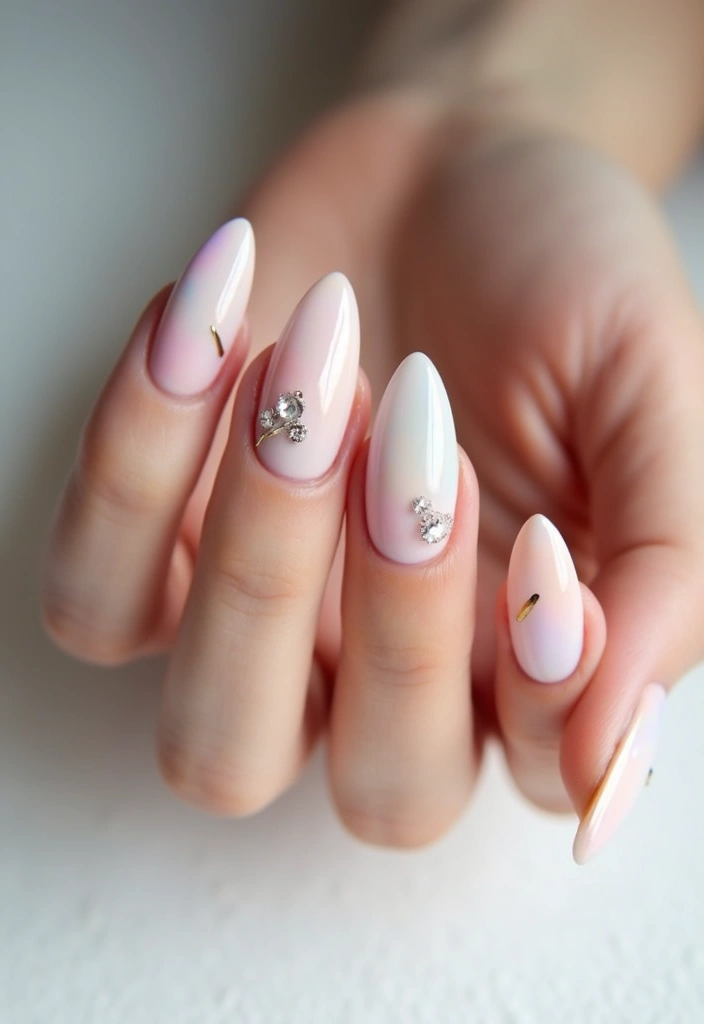
The world of nail art has taken on a stunning new dimension, especially with acrylic almond styles making waves this season.
Acrylic nails are not just about durability; they’re a canvas waiting for your creative flair. The almond shape, known for its elegant and elongated appearance, perfectly complements the bold designs that are trending in 2023. Each nail design tells a story, whether it’s a classic color palette or a vibrant, eco-friendly twist. Join us as we dig into 29 classy nail inspo acrylic almond styles that will inspire your next manicure. Get ready to unleash your inner artist and showcase those fabulous tips with trending designs that not only look amazing but also align with eco-friendly values.
Contents
- 1. Earthy Tones with Nature-Inspired Accents
- 2. Ocean Vibes with Turquoise and Coral
- 3. Monochrome Elegance
- 4. Geometric Patterns in Natural Tones
- 5. Floral Fantasy
- 6. Vintage Glam with Art Deco Styles
- 7. Minimalist Magic with Negative Space
- 8. Shimmering Metallics
- 9. Ombre Delight in Bright Colors
- 10. Edgy and Bold with Dark Colors
- 11. Playful Pastels
- 12. Sparkly Glam with Glitter
- 13. Candy-Inspired Delight
- 14. Luxe Marble Effect
- 15. Sweet Gradient with Pink and Purple
- 16. Chic Textured Nails
- 17. Bold Stripes
- 18. Textured Glitter Tips
- 19. Iconic Checkerboard
- 20. Sparkling Crystal Tips
- 21. Retro Polka Dots
- 22. Artistic Splatter Design
- 23. Cute Animal Prints
- 24. Lovely Lace Details
- 25. Rainbow Brights
- 26. Classic French Tips with a Twist
- 27. Statement Foil Accents
- 28. Color-Blocked Chic
- 29. Mysterious Galaxy Nails


1. Earthy Tones with Nature-Inspired Accents
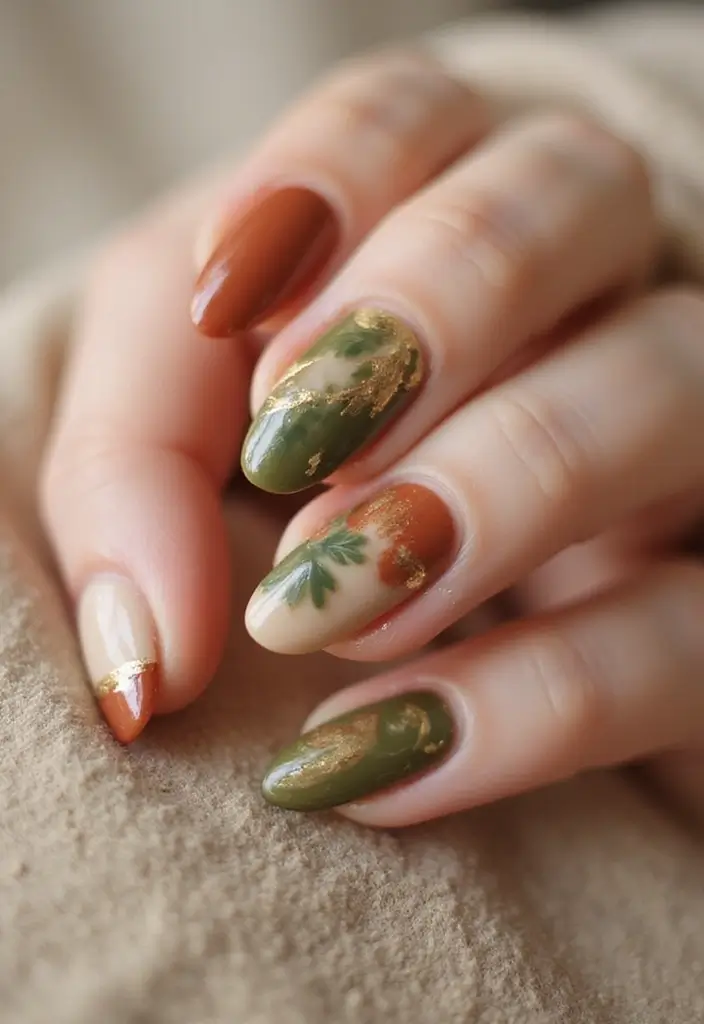
Going back to nature can be a beautiful experience, especially with earthy tones gracing your nails. Picture shades of warm browns, rich greens, and muted oranges adorned with delicate leaf or flower accents.
This style reflects a serene connection to the environment while showcasing elegant minimalism that’s perfect for any occasion. To achieve this look, start with an eco-friendly option like the Pacifica Natural Nail Polish – Plant Magic Green Nail Polish. This plant-based, non-toxic polish not only offers lasting colors but is also kind to your nails and the environment.
For a polished finish, consider applying the OPI Nail Lacquer Top Coat. This quick-drying top coat provides high shine and chip resistance, perfect for maintaining that sleek look while protecting your nail art.
To add an artistic flair, embellish your design with small leaf decals or hand-painted creations. The Nail Art Decals – Leaf Designs are a fantastic choice, featuring 3D holographic fall leaves that can elevate your nail style effortlessly.
Nature-inspired nails not only look chic but also remind us of the beauty around us.


2. Ocean Vibes with Turquoise and Coral
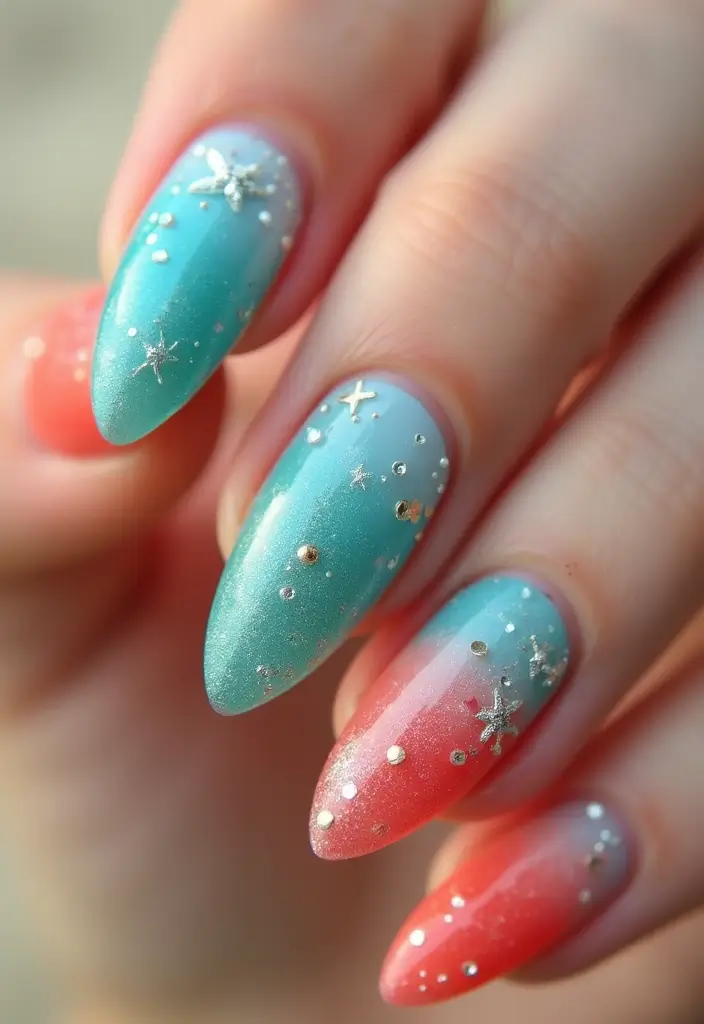
Capture the essence of the ocean with nail art that reflects the tranquil colors of sea waves. Think turquoise and coral shades blended together to emulate a beautiful beach sunset. This bright color combo is not just fun; it’s a way to express vivaciousness.
To achieve this look, start with a base of turquoise. For a perfect shade, consider using OPI Nail Lacquer Nail Polish in a lovely turquoise tone. It’s opaque, chip-resistant, vegan, and dries quickly, giving you that stunning foundation for your design.
Next, gradually blend coral tips to create an ombre effect using Essie Salon-Quality Nail Polish in Peach Side Babe. This peachy coral shade complements the turquoise beautifully and adds a soft, beachy vibe.
To elevate your design, add tiny seashell decals with nail art decals seashells. These self-adhesive stickers feature charming ocean life designs, perfect for mimicking sandy shores.
Finish your look with a glossy top coat for that extra shine. Ocean vibes are perfect for summer but can brighten up any day!


3. Monochrome Elegance
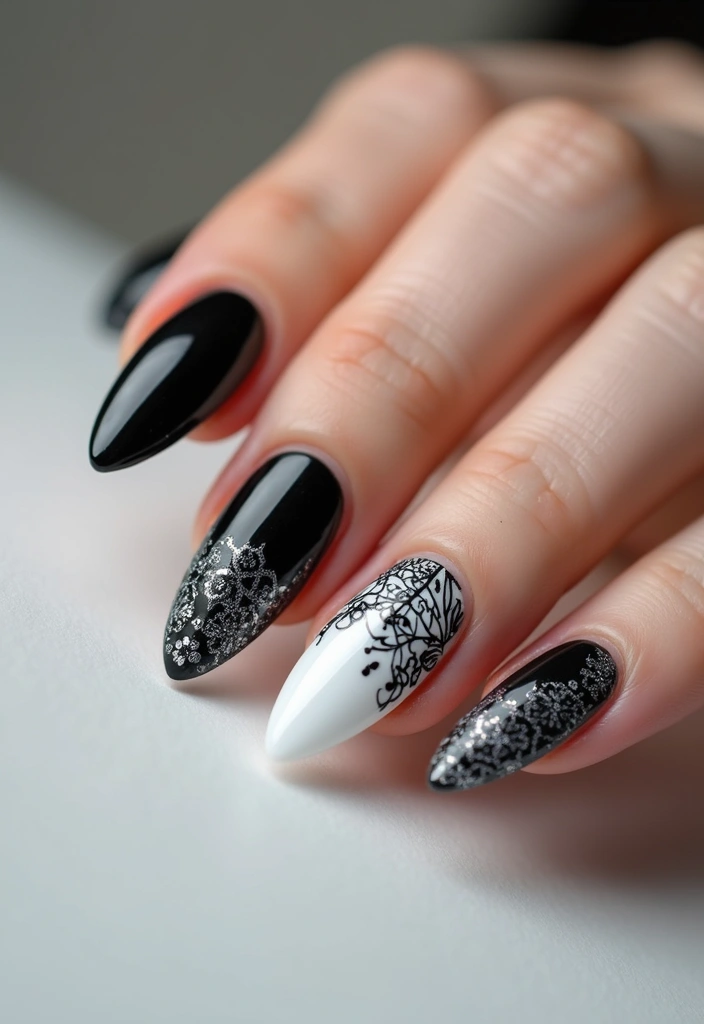
Sometimes, less is more! Monochrome nails can make a bold statement without being over the top. By sticking to one color but playing with different shades, you can create a sophisticated yet trendy look.
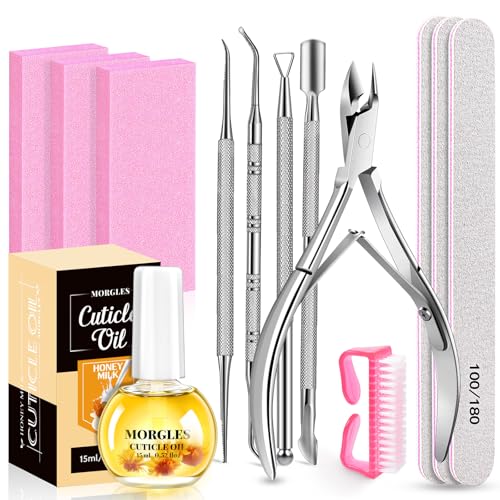
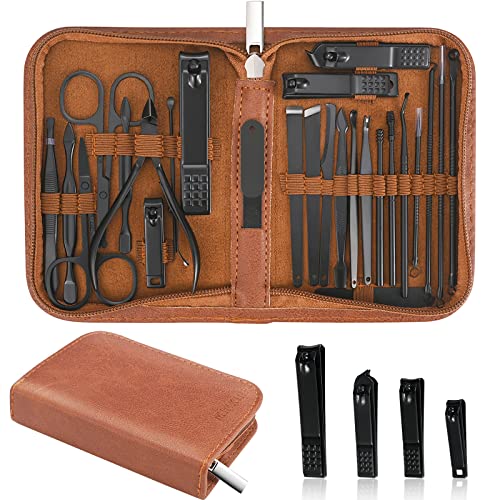
Opt for classic black or white, or explore deeper shades like navy or burgundy. To help you achieve that perfect monochrome style, consider using an acrylic nail kit for all your DIY needs. This kit provides you with clear, white, and pink powders, along with brushes, making it easy to create a salon-quality manicure at home.
Here are a few ways to experiment with your monochrome look:
– Use a matte finish on your main color and a glossy top coat on the tips for a striking contrast. For this, the matte top coat nail polish from OPI is an excellent choice, delivering a high-shine, chip-resistant finish that enhances the overall look.
– Add subtle nail art, like stripes or dots, to keep it interesting.
– Consider using sustainable brands that offer long-lasting formulas. The sustainable nail polish from Karma Naturals is a fantastic option, as it’s non-toxic, vegan, and cruelty-free, allowing you to express your style while being mindful of the environment.
Monochrome nails are timeless and can be styled for both formal occasions and casual outings. With the right products, you can easily create a polished, elegant look that stands out.


4. Geometric Patterns in Natural Tones

Geometric patterns bring an element of modern design to your nails. Using natural tones like soft beige, taupe, and muted greens will create a look that is both trendy and classy. To get started, try using Sally Hansen Insta-Dri, taupe priority, quick dry, long lasting, streak-free shine, nude nail polish as your base. This polish provides a perfect nude foundation that helps geometric designs pop.
Once your base is set, utilize nail art tape to create sharp lines and shapes with ease. This tape acts as an essential tool for ensuring your geometric patterns are precise, allowing for endless creativity without the usual mess.
To add dimension to your design, mix matte and glossy finishes. For this, consider finishing off your look with GAOY matte gel top coat. This top coat not only provides a beautiful matte finish but also protects your artwork, ensuring it lasts longer.
This style is perfect for those who love a touch of sophistication and artistry on their nails. Elevate your nail game with geometric patterns in natural tones! A little creativity with nude bases and a mix of matte and glossy finishes can turn your acrylic almond nails into a masterpiece of modern design.


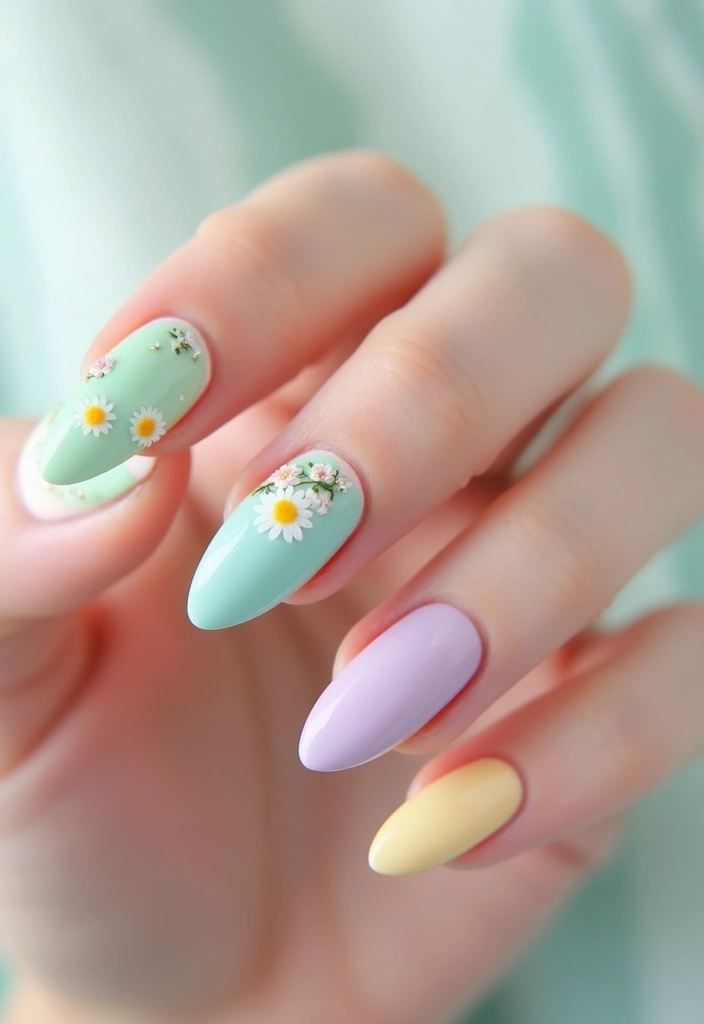
5. Floral Fantasy
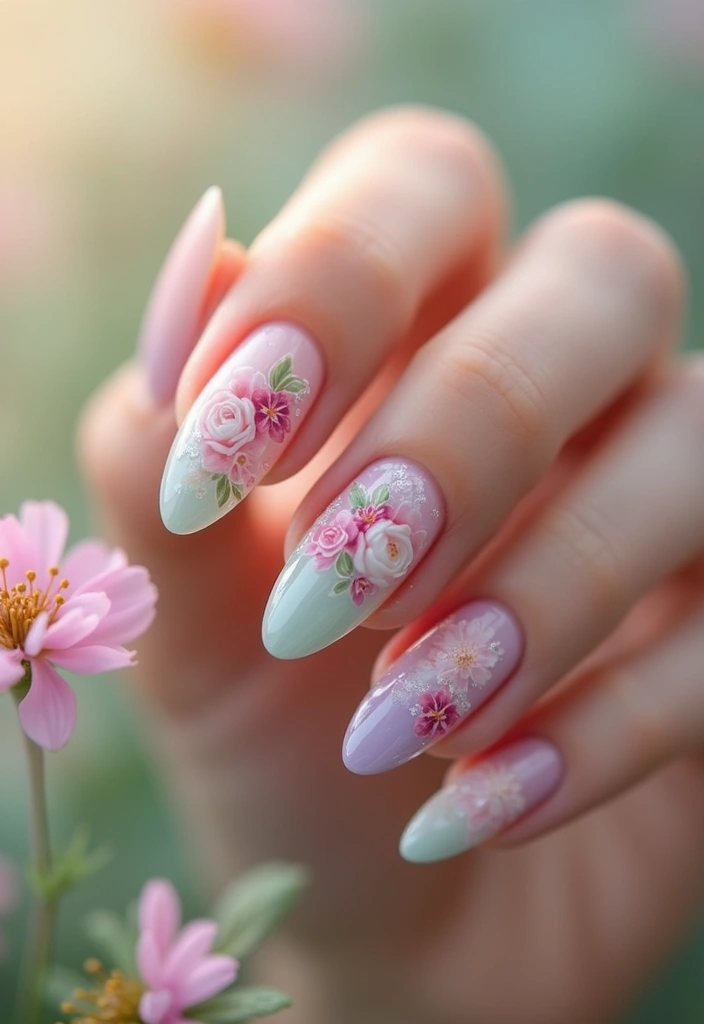
Floral designs are perennially popular and can be styled in a myriad of ways. Soft pastel colors mixed with intricate floral motifs can elevate your acrylic almond nails into a work of art. This look is ideal for spring or summer but can be adapted year-round.
Here’s how to do it:
– Start with a base coat of a light pastel shade, such as lavender or baby blue. For this, consider using the Beetles pastel nail polish set, which features six beautiful colors that are perfect for creating that soft, dreamy effect.
– Use fine brushes or dotting tools to create detailed flowers. The Nail art brushes set provides a range of tools including striping brushes and dust brushes, which will help you achieve precision in your floral designs. Additionally, you can incorporate the dotting tools for nail art; these are perfect for adding those delicate details that make the flowers pop.
– Finish with a glossy top coat for a fresh, blooming look.
Floral nails are utterly charming and definitely have a way of brightening your day. With the right tools and a little creativity, you can transform your nails into stunning works of art!


6. Vintage Glam with Art Deco Styles

Reviving the charm of the past, Art Deco designs bring a vintage glam vibe to your nails. Think bold lines, rich colors, and ornate details. To perfectly embody this iconic style, consider rich hues like gold, deep reds, and emerald greens.
To create this look, start with a solid dark base color and then use gold or white to draw geometric shapes or lines. For precision, the nail art brushes set is a fantastic tool, featuring various sizes that allow you to achieve long lines and intricate details effortlessly.
Next, embellish your nails with tiny studs or rhinestones for a luxurious feel. The rhinestones for nail art kit offers a variety of colorful and clear flatback rhinestones, perfect for adding that touch of elegance to your Art Deco design.
Finally, to ensure a smooth application, consider using an acrylic nail kit that includes everything you need for a flawless finish, from powders to brushes.
Art Deco styles are perfect for parties or whenever you want to feel like a Hollywood star! Plus, using eco-friendly products that cater to the vintage aesthetic enhances the overall experience.


7. Minimalist Magic with Negative Space
In the world of nail art, sometimes the magic lies in what you leave out. Negative space designs utilize your natural nail to create stunning, minimalist patterns that can be both chic and effortlessly elegant.
To achieve this look, start with a base coat of a nude or light color that matches your skin tone. A great option is the Sally Hansen Insta-Dri®, Taupe Priority, quick dry, long lasting, streak-free shine, nude nail polish. This polish not only provides a smooth application but also dries quickly, making it perfect for a busy schedule.
Next, you’ll want to create interesting shapes and designs. For this, consider using nail art tape. This handy tool allows you to easily mask off areas for clean lines and intricate patterns. The tape comes in various widths, so you can create unique designs that suit your personal style.
Once you’ve applied your contrasting color over the tape, simply peel it away to reveal the negative spaces. If you prefer a more playful touch, you can also incorporate some flair with nail art stickers. These stickers can help add delicate details, like floral designs, without the need for advanced painting skills.
This style highlights elegance and is perfect for those who appreciate simplicity while still wanting to make a statement.


8. Shimmering Metallics
Metallic nails have a way of catching the light and turning heads. Using shimmering polishes can instantly elevate your nail game, and the almond shape perfectly showcases this stunning style.
Choose from gold, silver, or even rose gold for that chic touch. To achieve this look, start with a base coat in a neutral tone to make the metallic color pop. A great option is the Metallic Nail Polish Set, which offers a variety of holographic metallic lacquers that will enhance your design beautifully.
Next, apply your chosen metallic polish and consider adding a matte top coat on some nails for a striking contrast. The Matte Top Coat for Nails will give you that perfect finish while protecting your metallic look from chips and wear.
For an even more glamorous touch, incorporate some nail art gems. Using Nail Art Gems and Rhinestones with super strong gel glue will help you create stunning 3D designs that catch the light just right.
Shimmering metallics work beautifully for evening events or whenever you want to feel fabulous!


9. Ombre Delight in Bright Colors
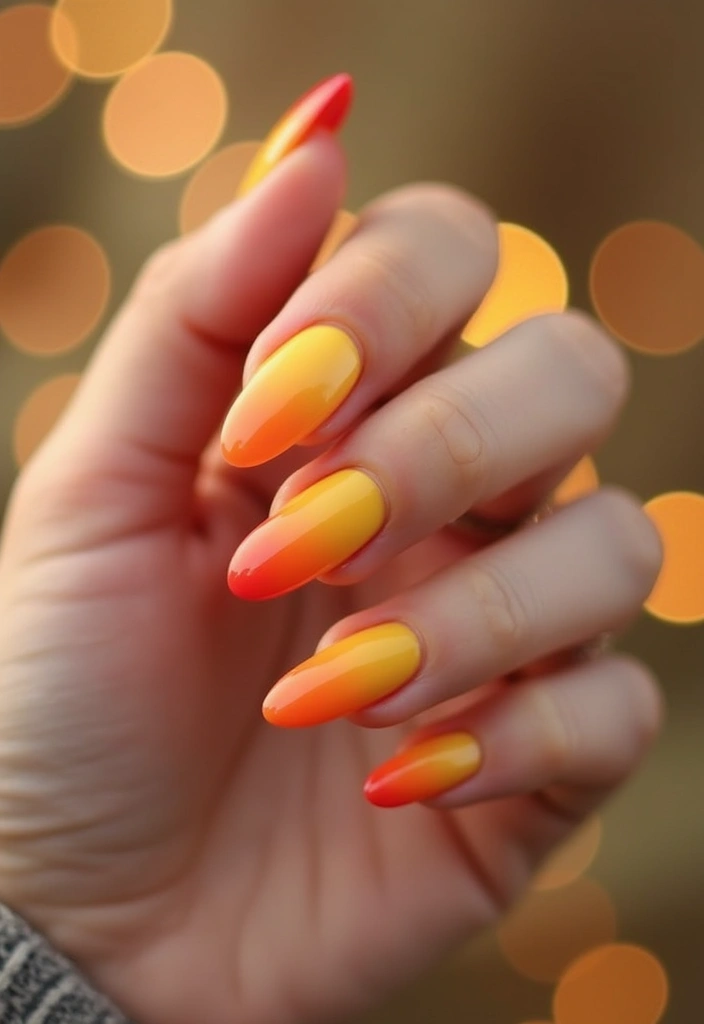
Ombre nails are a fun way to experiment with different color combinations, and they can truly transform your acrylic almond nails into a vibrant masterpiece. Bright oranges fading into yellows or pinks graduating to purples are just a few ideas to inspire your creativity.
To achieve this look, start by choosing your color palette and begin with the lightest shade at the base of your nails. For a seamless gradient effect, use a Nail Art Ombre Brush Set—its specialized brushes allow for easy blending of colors towards the tips. Once you’ve created your ombre effect, don’t forget to seal it all in with Top Coat Nail Polish. This quick-drying, long-lasting formula not only protects your vibrant colors but also adds a beautiful streak-free shine to your nails.
For those looking to expand their color options, consider the Acrylic Nail Color Set. With 36 stunning colors, you’ll have endless possibilities to create your perfect ombre look.
Ombre nails add a playful touch, making them perfect for festivals or summer outings. Brighten your day with this delightful nail art technique, and let your acrylic almond nails become a canvas for your creativity!


10. Edgy and Bold with Dark Colors
For those who love a bit of edge, dark-colored acrylic almond nails can be both bold and classy. Shades like deep plum, navy, or jet black can make a powerful statement, while the almond shape adds a sophisticated twist that’s perfect for the daring.
To rock this look, start with a dark base color, which you can easily achieve with the Nail Polish Set – Dark Colors. This kit features a range of rich hues, including glitter options, ensuring you have everything you need for a striking manicure.
Consider finishing your design with a matte or glossy topcoat to create interesting contrasts. You might also want to explore textures by mixing matte and shiny finishes, and adding metallic or glitter accents on one or two nails for a unique flair. For that, check out the Nail Art Glitter and Metallic Accents kit, which includes everything from brushes to fine glitter and rhinestones.
If you’re looking to try this style at home, the Acrylic Nail Kit is a great starting point. It comes with clear, white, and pink powders, along with brushes, so you can create the perfect almond shape with ease.
This style is all about confidence and can suit any occasion, from night outs to everyday wear.


11. Playful Pastels
Pastel colors have a soft, inviting appeal that is both playful and elegant. Combining shades like mint green, peach, and lilac can create a dreamy effect on your acrylic almond nails. This style is perfect for those who want a subtle, yet stylish look.
To achieve this charming design, start by painting each nail a different pastel color or create a gradient effect using two shades. For this, consider using the pastel nail polish set, which offers a beautiful range of soft colors to choose from.
Next, add tiny daisies or other small designs using a fine brush for a playful touch. The fine detail nail art brush set is perfect for this task, providing all the necessary tools to create intricate designs with ease.
Finally, seal your design with a glossy top coat for durability. The glossy top coat for nails not only enhances the shine of your nails but also protects your artwork, ensuring it stays chip-free.
Playful pastels are perfect for springtime or any day when you want to brighten your mood!


12. Sparkly Glam with Glitter
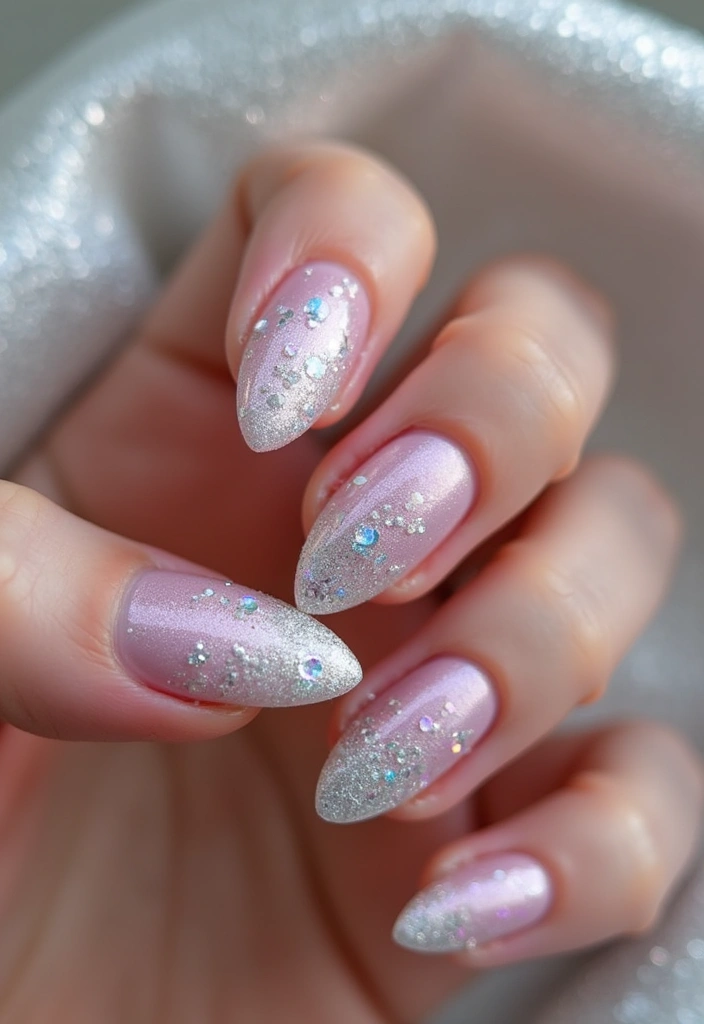
Who can resist a bit of sparkle? Glitter nails can make anyone feel glamorous, and they’re perfect for special occasions or just to bring some excitement to everyday life. Mixing glitter with classic colors can create a stunning visual effect.
Here’s how to achieve a sparkly look: Start with a solid base color, then add glitter to the tips or an accent nail. For that bold statement, you might want to try some chunky glitter like the chunky glitter for nails, which includes a variety of iridescent colors that can create a mesmerizing 3D effect. If you prefer a more subtle shimmer, consider using fine glitter from a set like the glitter nail polish set—it features a range of beautiful shades that dry quickly, making your nail art effortless.
Don’t forget to seal your creation with a top coat to keep the sparkle intact and ensure a long-lasting finish. The top coat nail polish is perfect for this, as it provides a chip-resistant, high-gloss finish that protects your color and lets your nails shine bright. Sparkly glam is all about feeling fabulous and catching the light!


13. Candy-Inspired Delight


13. Candy-Inspired Delight
Bring back childhood memories with candy-inspired nail art! Bright colors and fun designs can instantly elevate your mood and bring a smile to your face. Think of colors like bubblegum pink, lemon yellow, and sky blue combined with whimsical patterns.
To recreate this look, start with a Bright Nail Polish Set, featuring vibrant shades that are perfect for capturing the essence of your favorite candies. Use these bright base colors to create swirls or dots that mimic the delightful shapes of sweets.
For additional fun, incorporate nail art stickers. These stickers offer playful designs like lollipops or gummy bears, making your manicure even more whimsical. They’re easy to apply and can instantly add a burst of personality to your nails.
Finally, finish with a slick of glossy top coat. This will not only enhance the vibrancy of your colors but also provide that shiny, eye-catching finish that makes your nail art pop. This style is perfect for those with a playful spirit!
Brighten your day with candy-inspired nail inspo acrylic almond styles! A splash of bubblegum pink and a swirl of lemon yellow can turn your nails into a sweet treat that lifts your spirits.


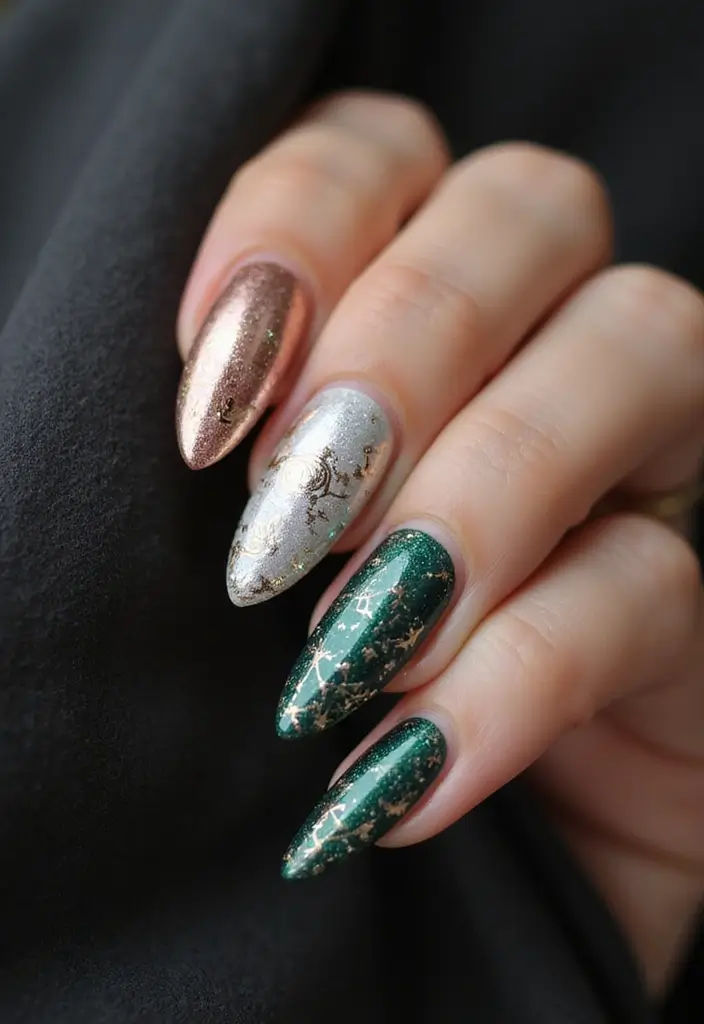
14. Luxe Marble Effect
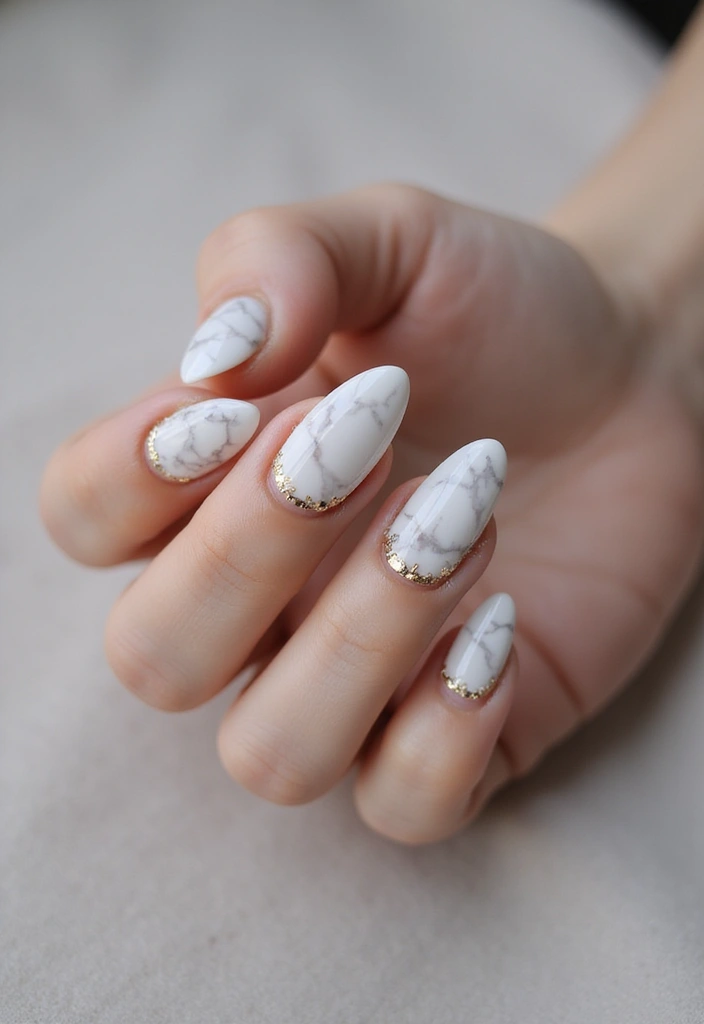
Marble nails give off an air of sophistication and are surprisingly easy to achieve! Use swirling colors to create that elegant marble effect that looks like a luxurious stone. Classic white, grey, and gold make for stunning nail art.
Here’s how to pull it off:
– Start with a base of light color, like white or pale grey. For this, you might want to check out the Acrylic Nail Kit, which provides a great selection of gel nails that can help you achieve that perfect base.
– Use a small brush or a straw to create swirling designs with darker shades. An excellent tool for this is the Nail Art Brush Set. This set includes a variety of brushes that enable precise application and intricate designs.
– Add small gold accents for a touch of luxury. For a stunning effect, consider using Nail Foil Flakes (Gold). These gold flakes can elevate your marble design and provide that opulent finish.
This look can be worn in professional settings or special occasions when you want to dazzle.


15. Sweet Gradient with Pink and Purple

Pink and purple gradients are not just pretty; they’re super trendy! This sweet combination can instantly brighten your day. To achieve this gorgeous look on your almond-shaped nails, start by creating a beautiful transition from light to dark shades.
To get that perfect blend, consider using a makeup sponge for nail art. It’s great for blending the two colors effectively, allowing for a smooth gradient effect. Once you’ve achieved your desired look, applying a glitter top coat nail polish can add some sparkle and shine to your nails, making them stand out even more.
If you want to elevate the look further, consider finishing off with a matte top coat nail polish. A matte finish can make the colors pop, giving your nails a chic and modern vibe.
A sweet gradient is perfect for any season and adds a fun twist to your look!


16. Chic Textured Nails
Textured nails are all the rage, adding depth and interest to your manicure. Using materials like sand, velvet, or even beads can create a unique tactile experience. For chic textured nails, consider using Nail Art Texture Powder Set to achieve that sandy finish that adds a touch of elegance. Pair this with Velvet Nail Powder for a plush look that enhances the depth of your manicure.
To get this look:
– Apply a base coat and while it’s still wet, sprinkle your chosen texture on top, like the products mentioned above.
– Let it dry and seal with a top coat to keep the texture intact.
– Combine textures on different nails for an eclectic feel. You can also add some flair with Nail Beads for Nail Art, which can provide that extra detail with mixed sizes to create stunning designs.
Chic textured nails are definitely eye-catching and can spark conversation!
Embrace the beauty of texture! Elevate your nail inspo acrylic almond game by layering sand, velvet, and beads for a chic look. Remember, elegance is in the details!


17. Bold Stripes
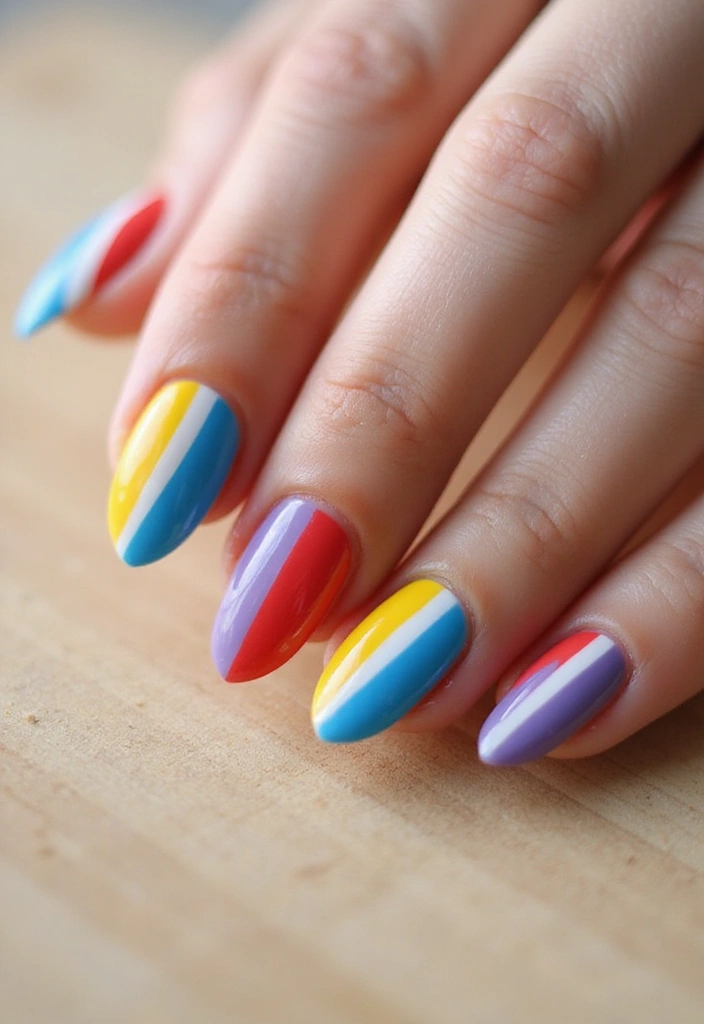
Striped nails can be as bold or subtle as you want! This classic design can add a fresh, modern twist to your acrylic almond nails. To achieve those striking stripes, start with a solid base coat using Sally Hansen Double Duty™, base and top coat nail polish for a quick-drying, long-lasting finish that provides streak-free shine.
Next, use tape to section off areas for stripes. The nail art tape is perfect for this step, as it allows you to create clean lines and intricate patterns effortlessly. Simply paint over the top and, after a few moments, remove the tape to reveal your beautifully defined stripes.
Feel free to experiment with diagonal or vertical stripes for a fun twist. Additionally, to refine your application, a Acrylic nail brush set can be a great tool for detailed work and perfecting your design.
Bold stripes are timeless and work for any occasion, making this technique a must-try for your next nail art session!


18. Textured Glitter Tips

If you love glitter but want something different, try textured glitter tips! This design adds a stunning allure while keeping the look sophisticated.
To achieve this beautiful nail art, start by using a base coat in a solid color, such as a nude or soft shade. A great option for this step is the Sally Hansen Double Duty™, Base and Top Coat, which provides a smooth foundation for your manicure and ensures your color lasts longer.
Next, apply chunky glitter only to the tips using a thicker glitter polish. The L.a. COLORS Glitter Vibes Polish, Golden Glow is perfect for this, as its chunky texture will add the right amount of sparkle while still looking elegant.
Finally, seal the design with a top coat to give it a polished finish. You can use the same Sally Hansen Double Duty™ top coat that you used as a base, ensuring a streak-free shine and long-lasting wear.
Textured glitter tips are perfect for adding a touch of glam to any look!


19. Iconic Checkerboard

Checkerboard nails are making a comeback and are perfect for those who want to add an edgy vibe to their look. This iconic design can be achieved using contrasting colors like black and white or any combination you prefer.
To nail this style, start with a base coat in one color. For a smooth application, you might want to use an acrylic nail kit that includes essential tools and powders for home DIY. Once your base is dry, use tape to section off squares; nail tape strips work perfectly for this, ensuring clean lines as you paint the other color within the sections. Finally, finish with a glossy top coat, like Sally Hansen Double Duty™, to enhance the design and give it that streak-free shine.
Checkerboard is a fun and bold way to show off your personality!


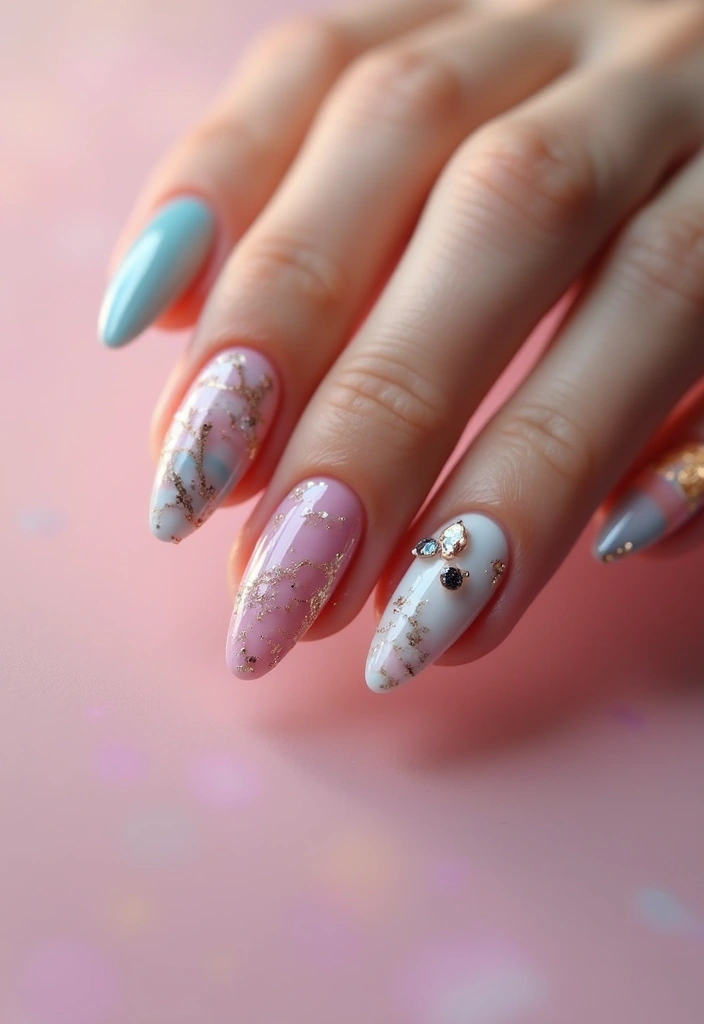
20. Sparkling Crystal Tips

Add a touch of luxury with sparkling crystal tips! This stunning design shines bright and elevates your nails to a whole new level.
To create this look, start with a solid base and gradually transition into crystal accents at the tips. Begin by choosing a base color that complements the crystals, like a nude or soft pink. For the sparkling effect, you’ll need some rhinestones or crystal stickers at the tips. The nail rhinestones and gems set is perfect for this, as it includes a variety of sizes that will help you achieve that dazzling finish.
Once you’ve applied the rhinestones, seal the design with a top coat for durability. The base and top coat nail polish not only protects your nails but also ensures that your design lasts longer and maintains its shine.
Additionally, if you want to get creative with the application, consider using various tools. The nail art brush set provides you with everything you need for precise placement and detailed designs, making it easy to customize your sparkling crystal tips.
Sparkling crystal tips can turn your nails into a dazzling statement piece!


21. Retro Polka Dots
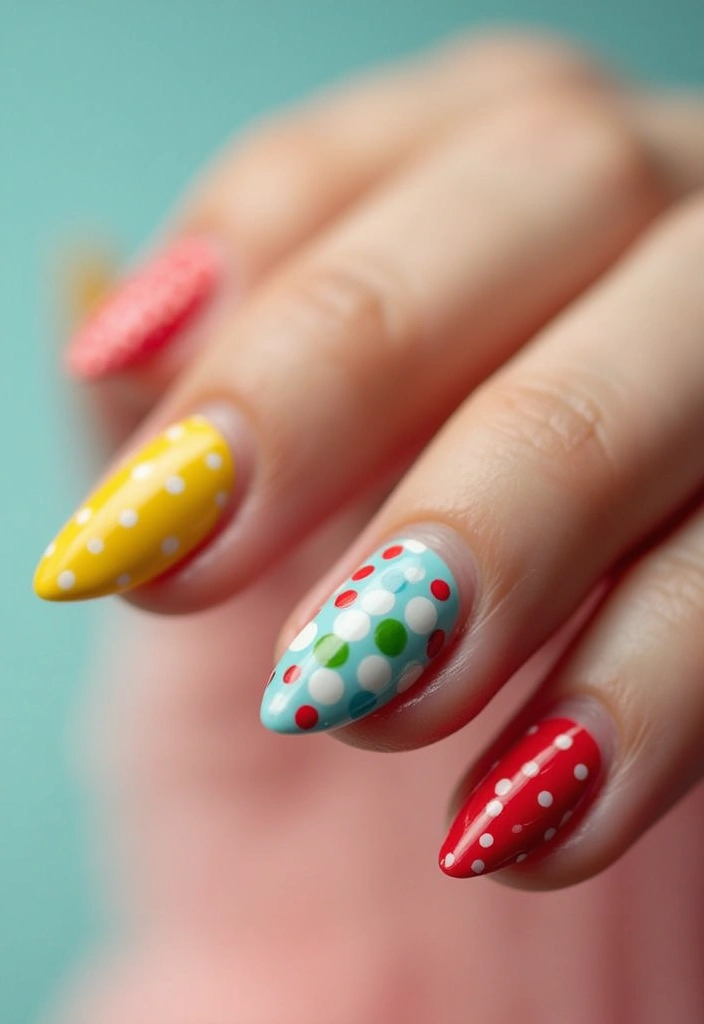
Polka dots have a playful charm that never goes out of style. This retro design can add a fun twist to your acrylic almond nails, making them eye-catching and unique. To help you achieve this look, consider using an acrylic nail kit, which includes everything you need for your nail art, including clear, white, and pink powders, plus brushes for easy application at home.
To create your polka dot nails, start with a solid base color from a versatile set like the nail polish set that offers a variety of bright and muted tones. Whether you choose whimsical colors for a playful vibe or opt for muted tones for sophistication, this set will cover all your needs.
Once your base is dry, use a dotting tools set to create dots in contrasting colors. The dotting tool allows you to mix up the sizes for a delightful and dynamic effect. Retro polka dots are perfect for those who love a touch of nostalgia in their nail art!


22. Artistic Splatter Design

Artistic splatter designs can be a bold way to express creativity on your nails. This style allows for a fun mix of colors and is surprisingly easy to create! To get started on this unique look, you’ll want to choose a solid base color. A great product for this is the OPI Nail Lacquer Top Coat, which not only provides a high-gloss finish but also protects your nails and color, ensuring your splatter design looks stunning and lasts longer.
Once your base is set, it’s time for the splatter! You can use a toothbrush or a small brush to achieve this effect. For precise and varied designs, consider the Nail Art Brush Set. This set includes various brushes that are perfect for flicking paint onto your nails, allowing you to create intricate patterns with ease.
For adding color, you can use the Acrylic Nail Paint Set, which features a range of vibrant shades. These pens are perfect for achieving that artistic splatter effect, making it easy to mix and match your favorite colors.
Finish off your masterpiece by sealing it all with a coat of the OPI Nail Lacquer Top Coat, ensuring your artistic splatter nails not only look fabulous but also stand out with a polished finish! Artistic splatter nails are perfect for those who love to stand out!
23. Cute Animal Prints
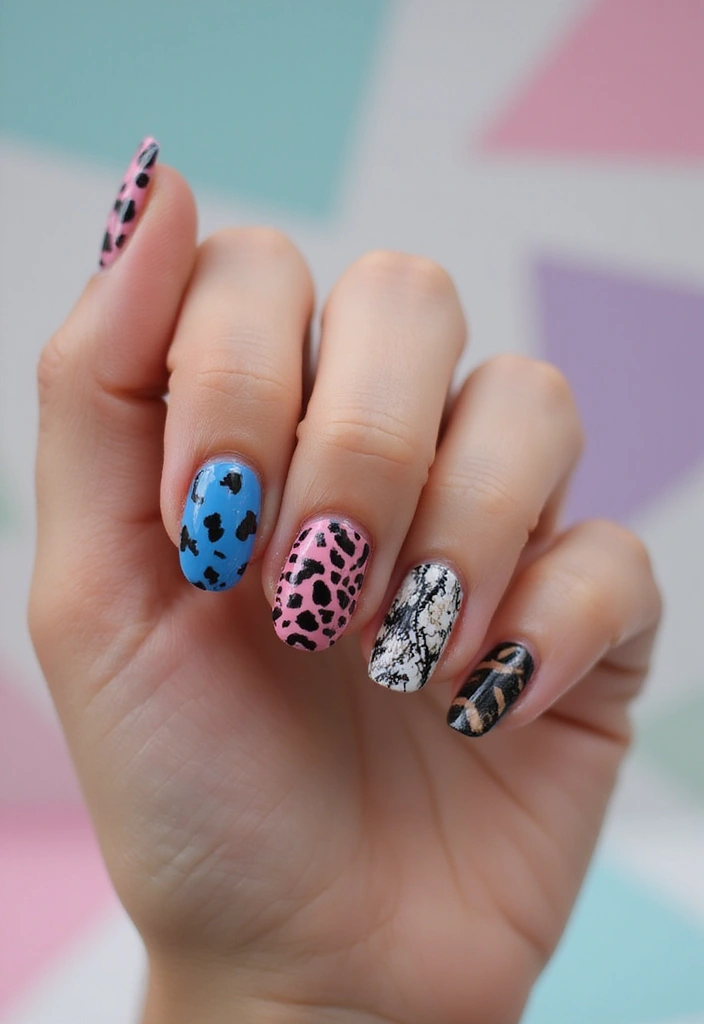
Animal prints can add a wild and fun vibe to your acrylic almond nails! From leopard spots to zebra stripes, the possibilities are endless. This trend allows you to express your personality through playful creativity.
To create animal print nails, start with a base coat in a neutral or pastel shade, such as those found in the gel nail polish set (neutral and pastel shades). This set offers a shine finish and long-lasting wear, making it perfect for your base layer.
Next, to add the animal print patterns, you can use an acrylic nail art brush set. With its fine brushes, you can easily create intricate designs in darker shades. This tool set is ideal for drawing precise lines and details, ensuring your animal prints look professional.
For an eclectic look, don’t hesitate to mix different animal prints. If you’re looking to add even more creativity to your nail art, consider using a nail art stamping kit. This kit includes various templates that can help you achieve unique designs quickly and effortlessly.
Animal prints are always in style and can be dressed up or down, allowing for endless creativity in your nail art endeavors.


24. Lovely Lace Details
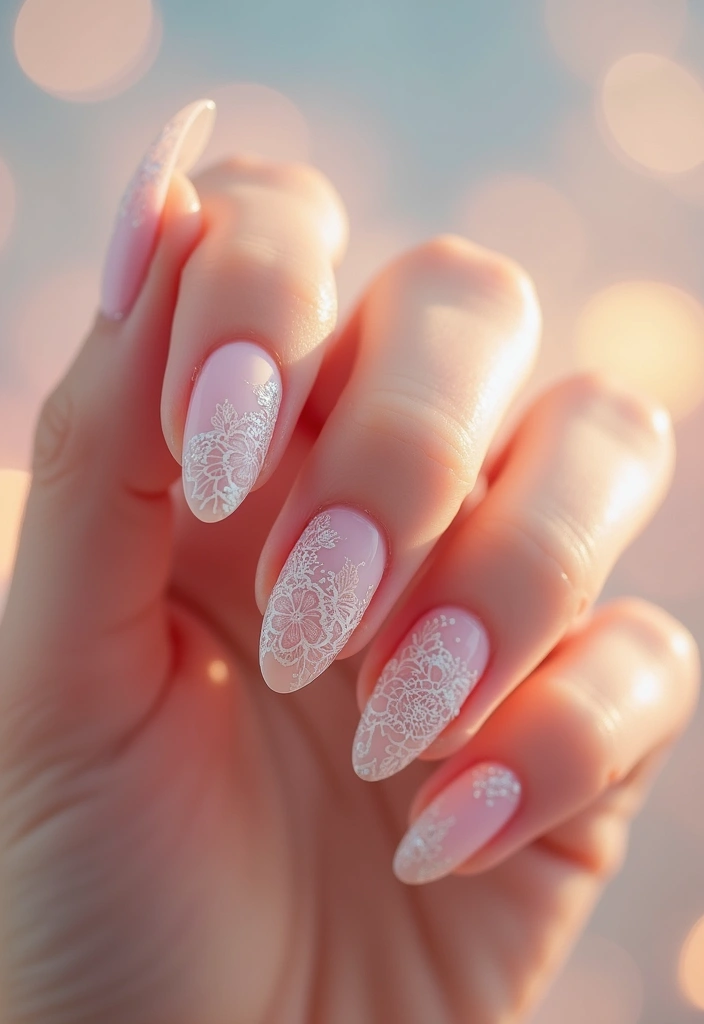
For a romantic touch, lace details can transform your acrylic almond nails into delicate pieces of art. This feminine design is perfect for special occasions like weddings or date nights. Choose soft colors to complement the lace patterns.
To achieve this look, start with a light base color, like pale pink or white. Then, consider using a fine brush from the nail art brush set to create intricate lace designs. If you prefer a quicker method, lace nail stamps from the lace nail stamps set offer precision and ease, allowing you to achieve stunning patterns effortlessly.
Finish your masterpiece with a glossy top coat like the glossy top coat, which will enhance the shine and durability of your nails. Lace details evoke a sense of elegance and are perfect for those who appreciate soft aesthetics.


25. Rainbow Brights
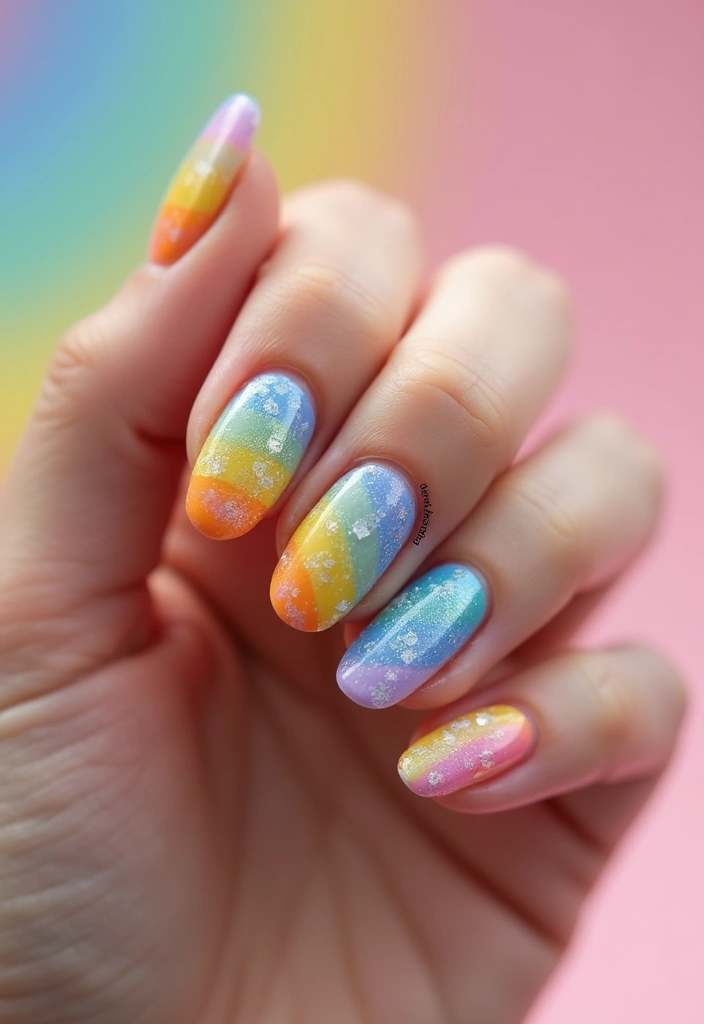
Rainbow nails can manifest joy and positivity! This cheerful design can brighten up even the gloomiest of days. Mixing vibrant colors can create a fun and youthful look on your acrylic almond nails.
To create rainbow nails, start by painting each nail in a different color or opt for a gradient effect that blends seamlessly. For those looking to add some flair, use nail art tape strips to create fun patterns, such as stripes or triangles. This tool allows for precise designs that elevate your nail art to the next level.
Once you’ve achieved your colorful masterpiece, seal it with gel top coat for a shiny finish and long-lasting wear. This product not only enhances the vibrancy of your colors but also protects your nails from chipping, ensuring your rainbow nails look fabulous for days.
For those new to nail art, consider using an acrylic nail kit, which provides everything you need to get started—clear, white, and pink powders along with brushes for home DIY. With this kit, you can perfect your acrylic nails and create stunning rainbow designs that are perfect for summer festivals or whenever you feel adventurous!


26. Classic French Tips with a Twist

The timeless French tip gets a modern makeover! Instead of the classic white tips, experiment with colors or designs that give a fresh spin to this iconic style. Try using pastel, neon, or even metallic colors for the tips.
To achieve this look, start by painting your nails with a nude or soft pink base. For the tips, use a contrasting color and consider adding fun designs like glitter or stripes—this is where a nail art brush set can come in handy. With various brushes included, you can easily create intricate designs that elevate your manicure.
Next, choose your favorite colors from a gel nail polish set. This set offers a wide range of shades, including pastels and vibrant hues, giving you plenty of options to personalize your tips. The quality of gel polish also helps ensure that your manicure lasts longer and looks sleek.
Finally, finish your look with a layer of top coat for nails. This will not only add a glossy shine but also protect your design from chips and scratches, keeping your nails looking fresh for days.
Classic French tips with a twist maintain elegance while showcasing your personal style!


27. Statement Foil Accents

Foil accents bring an eye-catching shine that can elevate any nail design! This trendy look is perfect for those who want to add a touch of luxury to their acrylic almond nails.
To achieve this stunning effect, you’ll want to start with a base color of your choice. Next, apply foil glue, such as Beetles Nail Foil Glue, to specific areas where you’d like to place the foil. This product is essential as it ensures that the foil adheres properly to your nails, creating a long-lasting finish. After applying the glue, lay down the foil, which can be found in various colors and patterns, like the ones in NXJ INFILILA Nail Foil Sheets. These sheets allow you to experiment with unique textures and designs.
Finally, seal everything with a top coat to protect your beautiful work. The Sally Hansen Double Duty Top Coat is perfect for this step, offering quick-dry properties and a streak-free shine that will keep your nail art looking fresh and vibrant.
Foil accents are perfect for making a statement and can pair beautifully with solid colors, so get creative and have fun with your designs!


28. Color-Blocked Chic

Color blocking is a fun and vibrant way to showcase your acrylic almond nails. This design allows for playful combinations of colors and shapes that can turn heads!
To achieve this eye-catching look, start by selecting two or three bold colors that pop together. You’ll want to make sure you’re equipped with the right tools, such as nail art tape. This tape helps you section off parts of the nail neatly, leaving areas for different colors without the mess.
Once you’ve applied the tape, grab an acrylic nail polish set with vibrant shades. This will provide you with plenty of options to mix and match for your color-blocked design. The quick-dry formula ensures you won’t be waiting around too long for each layer to set.
After painting each section, remember to seal in your masterpiece using a top coat nail polish. This not only adds a beautiful, streak-free shine but also enhances the longevity of your color-blocked nails, keeping them looking fresh longer.
Color-blocked chic is perfect for those who love to experiment and stand out!


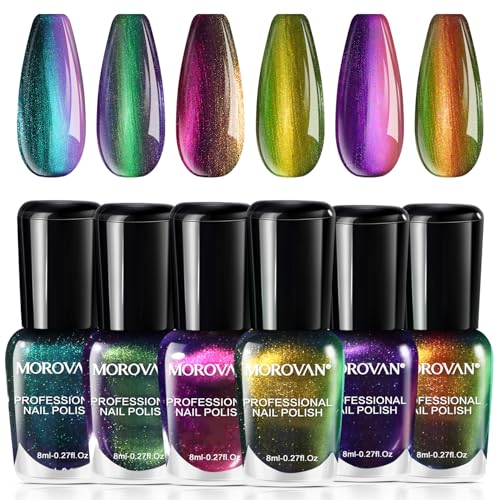
29. Mysterious Galaxy Nails

Bring the universe to your fingertips with galaxy nails! Using deep colors like navy, purple, and black can create a mesmerizing cosmic effect. This style is perfect for anyone who loves a bit of mystery and creativity.
To achieve stunning galaxy nails, start with a dark base coat. Then, use nail art sponge applicators to dab on lighter colors, achieving that ethereal layered look. Adding white dots with nail dotting tools can mimic stars beautifully, and a star-shaped sticker serves as a charming accent to enhance the galactic vibe. Finally, seal your masterpiece with glossy top coat nail polish to give a polished finish that lasts.
Mysterious galaxy nails can truly make your fingers look out of this world!


Conclusion

With so many classy nail inspo acrylic almond styles to choose from, your manicure can truly reflect your personality and creativity.
From playful pastels to chic monochrome designs, there’s something for everyone. Don’t be afraid to experiment with different trends and find what resonates with you.
These designs open a world of possibilities, allowing you to express yourself in stunning ways.
Note: We aim to provide accurate product links, but some may occasionally expire or become unavailable. If this happens, please search directly on Amazon for the product or a suitable alternative.
This post contains Amazon affiliate links, meaning I may earn a small commission if you purchase through my links, at no extra cost to you.
Frequently Asked Questions
What Are Acrylic Almond Nails and Why Are They Trending?
Acrylic almond nails are a stylish nail shape that combines the durability of acrylic with the elegant almond shape. This season, they’re trending because they offer a perfect blend of classy nail art and modern design. Their versatility allows you to experiment with various acrylic nail designs, making them a favorite among beauty enthusiasts!
How Can I Choose the Right Color for My Acrylic Almond Nails?
Choosing the right color can be fun! Consider your personal style and the vibe you want to convey. Earthy tones and pastels are great for a natural look, while bold shades can express your adventurous side. You can even mix and match colors for a unique nail inspo acrylic almond style that stands out!
What Are Some Eco-Friendly Nail Products to Use for Acrylic Almond Nails?
Going green with your nail care is easier than you think! Look for brands that offer eco-friendly nail polishes and removers, which are free from harsh chemicals. Many brands now focus on sustainable practices, ensuring your beautiful acrylic almond nails are also kind to the planet!
Can I Do Acrylic Almond Nails at Home, or Should I Visit a Salon?
While it’s possible to achieve acrylic almond nails at home with the right tools and practice, visiting a salon can ensure a professional finish. If you’re new to acrylics, a salon might be your best bet for that flawless classy nail art look. However, with tutorials and patience, you can also create stunning designs yourself!
What Are the Best Nail Care Tips for Maintaining Acrylic Almond Nails?
To keep your acrylic almond nails looking fabulous, regular maintenance is key! Make sure to moisturize your cuticles, avoid using your nails as tools, and schedule regular fills at your salon. Additionally, using a good quality top coat can help your acrylic nail designs shine and last longer, ensuring your nails always look their best!
Related Topics
nail inspo acrylic almond
acrylic nail designs
classy nail art
trendy nail ideas
earthy tones nails
floral nail designs
minimalist nail art
ombre nails
glitter nails
easy nail designs
fashionable nail styles
2023 nail trends